
 HOME
HOME


Barry Groves talks about making a conventional Flight bow
Introduction
Not only did the late Harry Drake shoot Flight he was very much the Flight
bowyer. Many of the world's Flight archers shot Drake bows and most of the
regular Flight records were made with them. But, alas, Harry is no longer with
us and with his passing has gone the last man who made Flight bows
commercially. Unless someone will take Harry's place, regular Flight archers
will have to make their own bows.
With compound Flight bows the situation is different. Merlin Bows of
Loughborough now market a Compound Flight bow — and it is a very good one. I
made over 1,162 yards in Nevada in 1997 with the first one which had a peak
weight of only 30kg (66 lbs). This was with a 15½" carbon arrow weighing 97
grains (6.28 grams).
All bows are expensive, which makes archery expensive. But it need not be so.
It is possible to make your own Flight bow, either recurve or compound quite
cheaply. And it is not as difficult as you might think. Below is an idea for a conventional, recurve Flight bow, but a compound
Flight bow could also be made in a similar way.
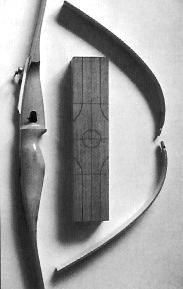
The (easy) homemade Flight bow
Flight bows have four components: a pair of limbs, riser which holds them
apart, a handle and an overdraw. The shortcut is to let someone else make the
limbs, which are the really difficult part, while you make the rest.
A Flight bow is a short bow: overall its length is around 900-950mm (36-37½")
with a riser in the order of 350mm (14"). So the working length of each limb is
275-300mm (11-12").
Method
Beg, borrow or, if you have to, buy a pair of secondhand Target bow limbs or a
one-piece recurve Target bow. Make it a cheap secondhand one as you are going
to mutilate it. It doesn't matter if the riser is damaged, you won't need it.
Next get a piece of seasoned hardwood 350x75x50mm (14x3x2"), finished sizes,
for the riser. The riser's 75mm dimension is its width.
Cut the limbs off at about 400mm (16"), measured around the recurve, with a
band saw or a sharp hacksaw, taking care not to split the fibreglass. It is
better to have them slightly too long than slightly too short. Lie the riser
wood on its belly on a table. Line up one limb against the side of the riser so
that it extends beyond the riser by 300mm (12") at such an angle that the inner
end of the limb is in line with the top edge of the riser wood and the bottom
of the recurve is touching the table. Mark the side of the riser along the line
of the limb. Mark the other end of the riser with a similar line so that the
two ends are symmetrical. These wedge-shaped pieces will be cut off.
It is important that the riser is cut accurately where the limbs are to fit.
Take the riser blank to a professional woodworker. Ask him to cut off the two
wedges accurately and also drill a 38mm (1½") diameter hole through the centre
of the riser from front to back. You will shoot the arrow through this hole.
That is all the wood it is necessary to remove to make the riser, but it will
look pretty crude. I will let you decide on the cosmetic treatment.
To fit the limbs requires side plates, or similar, to stop the limbs moving
sideways and a bolt through each limb and the riser to bolt them on. (It may be
possible to use wood screws into the wood if the poundage is not too high.)
Bow weight depends on the weight of the limbs chosen and the amount of prebend
when the bow is strung. You will have to experiment here.
Flight bows are much more highly strung than Target bows. Start by stringing to
give a bracing height of 100mm (4") using 8 strands of Fastflite (You will
probably reduce this to 6 strands in competition). The bow should shoot 15 inch
arrows so, with an overdraw back to the string, the draw length needs to be 19"
measured from the belly of the bow.
To test, draw the bow mechanically using a spring balance and measure the
draw-force curve. The weight divisions are given in the Flight rules. From this
basic setup, you can shave the limbs, change the stringing or alter the angle
of the limbs on the riser to achieve the weight you want.
Handle
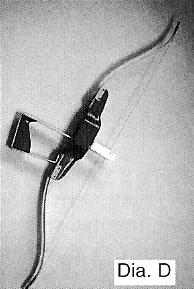
A bow with such a small bracing height is almost impossible to shoot with the usual vertical handle on the riser. The usual Flight handle today is one which is fitted in front of the riser. This not only gets over the problem of hitting your wrist, it also allows the bow to be drawn back to the face. The handle can be mounted either vertical or horizontal. An alternative, and a way that Harry Drake shot, is to turn your bow hand inwards through 180 degrees, as though you were pushing the bow away from you, and using a suitable support on the belly of the bow. This keeps your arm out of the string line without the forward handle. It takes some getting used to.
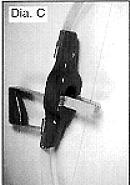
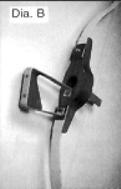
Overdraw
A simple overdraw, which is very effective consists of two strips of metal, one each side of the string, which are fastened to the riser and have vertical saw cuts just in front of the string. The saw cuts hold pieces of 1/16" thick balsa wood into the top of which is a 'v' notch to guide the arrow. This should lie directly in front of the nocking point on the string. The only snag with it is that you will need lots of bits of balsa as you break one each time you shoot.
NOTE: This bow may not break records but it is an easy, cheap, fun Flight bow to start with and you should be able to get your Master Flight Shot qualification in Britain with it.
Last updated 30 January 2003
Related Articles
